1. Create a Windows 7 Bootable USB Device.
2. Setting BIOS to boot from USB
-------------------------------------
Materials and Software needed:
-------------------------------------
1. Download Windows 7 USB/DVD Download tool and install
Direct link: Download
Website : Intel website (incase the direct link broken or moved)
2. A 4GB(recomended) pendriver/Flash drive.
(this is because the file for windows 7 is larger then 3GB)
3. A Windows 7 ISO files OR windows 7 DVD.
--------------------------------------------------
PART 1: Create a Windows 7 Bootable USB Device
------------------------------------------------------------
1. First make sure you already install Windows 7 USB/DVD Download tool.
2. If you have Windows 7 DVD insert it in your DVD/CD ROM and for those who have Windows 7 ISO file proceed to step 3.
3. Now open the Windows 7 USB/DVD Download tool software ans select browse.
4. Now you have to choose your ISO file, If you have the ISO file stored in your computer browse for the ISO file and if you are using DVD select your DVD after clicking browse. After select the file press Open/Ok.
5. Then select next.
6. Then select the USB devices.
9. Now you need to select your pendrive. note that in 1 (picture below) confirm that you choose the USB device that you will use to create bootable USB. If it show othe devices click on it and select your USB drive. After that select COPY.
8. NOW you it will prompt two times to confirm because this process will erase and format your USB devices/pendrive and all your data in the pendrive will lost.
select Erase USB device
Select OK
(note for beginner: this will not erase any data in your hardisk, it will only erase data in your Pendrive)9. After that it will begin formating and copying, just wait until it finish.
10. After complete, now you are ready to install windows 7 using your USB device.
11. Now you can safely remove your USB and proceed to boot from you USB.
----------------------------------------------
PART 2: BOOT FROM USB DEVICES
-----------------------------------------------
1. Ok now your USB now can be use to install windows 7 on your Notebook/PC, but first you need to change the device order.
2. The setting may differ from one model to another, i hope you canfigure it iout after reading the steps below.
3. restart your notebook/PC. ans see at the picture below. It show press F2 to enter setup. now press F2.
This post screen is fast so you need to press F2 as Quickly. Other computer like mist desktop have to predd DEL (delete button) to enter the BIOS.
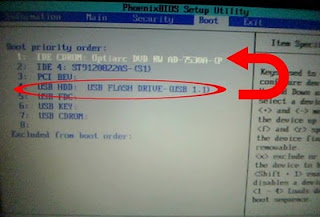
4. Now at the BIOS look for the BOOT like in the picture below. Your flash should be in the first boot order.
5. If not move it by press F6(up) and F5(down) , note: other notebook may need to press +/- to move the USB flash drive as the first boot device in the boot order.
6. Then press F10 (to save the current configuration) and press enter.
restart and you will see the windows 7 setup is starting.


No comments:
Post a Comment